


Herringbone is a classic pattern that will stand the test of time, which is important for both new builds and retrofits, as end users neither have the time nor the budget to frequently update flooring.
The pattern itself dates back to the Roman Empire, inspired by the composition of the bones of herring (fish). The Romans laid street pavers in this pattern because the bricks could endure more pressure this way than when laid straight. While the Romans used the pattern for its function, the Egyptians used it for fashion by incorporating it into jewellery and textile design.

Roman herringbone brick, Palace of Versailles
Herringbone was first incorporated into flooring design in 16th century France. In the 17th and 18th centuries, herringbone floors were laid throughout castles and homes of the elite throughout Western Europe, including the Palace of Versailles. No longer reserved for the upper class, today herringbone embodies attainable luxury.
With Karndean Designflooring luxury vinyl, there are options to create a herringbone in our LooseLay and Gluedown ranges.

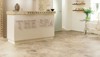
University of North Texas Case Study
Classic Herringbone or Chevron: A simple pattern with beautiful impact. The above shows a traditional herringbone pattern, in which the planks are laid at 90-degree angles to one another. You can run full-size planks in a herringbone pattern in larger spaces or choose from our parquet planks (available in select colours) in smaller spaces like individual offices or narrow hallways.
Framed Herringbone: In spaces that do not have open layouts, but are separated by walls, laying planks straight around the perimeter of the room anchors the design and gives it a finished look. For example, an office break room or hotel meeting room.

Glacier Oak Panel RL21, SM-RL21 - not currently available in Australia and New Zealand
Herringbone Panels: You can create small panels (similar to a framed herringbone) to add visual interest to areas like stair landings and long corridors. You could also install a large panel to highlight a key area like a retail display or a reception desk.
Installing Herringbone

1. When using the pattern throughout an entire space, begin by measuring and marking both the length and width of the room in the center to create four equal quadrants. Verify that your marks are square by using the 3’-4’-5’ (6’-8’-10’) triangle method, a laser level, or preferred technique.
2. To find the center of the pattern, take your Karndean plank/tile and mark a 45° line from the bottom corner across the width.
3. Measure from the top corner to the 45° mark. This measurement gets divided in half for each side of the center line. Remember, the center of the room is not the centre of the pattern.
4. Once the center lines are confirmed square, mark additional lines on both side of the center line, based on the dimension from the previous step. The lines will be where the corners of the plank land.
5. Pick a quadrant to start laying the floor. Use a square in the corners to ensure they are laid square. You can dry lay the first few rows to make sure.
6. Lay a second row of plank/tile to ensure the corners are staying on the lines. Be sure to check for squareness each time you start another row. If all corners are spot on, work outwards until you have one double-plank row extending to both sides of the room.
Once you reach the wall, an angle finder or speed square can be used to determine the angle of the piece that needs to be cut. Once the angle is determined, a template can be cut for quicker installation. A new template may be needed for each wall, depending on the squareness of the room. Work one row at a time until completion.
Herringbone patterns are a way to add visual interest without adding substantial cost or time onto the install. Experiment with different herringbone layouts using Floorstyle, our digital floor visualiser!